I will go through the process of creating a basic plugin today using the CRM 2013 Developer Toolkit and CRM 2013 Online, which in my case is a trail.
STEP BY STEP VIDEO
I created a video to go through creating a simple plugin, which I recommend you watching but I have also go through the steps in a blog post because you might want to reference the steps later without watching the video (e.g. YouTube might be blocked at work). I would also add there is a lot more explanation in the video than on the blog post.
CRM 2013 – Create a simple plugin in CRM 2013 using the CRM Development Toolkit
I would recommend looking at the CRM 2013 SDK because it is very useful and documents what all the options available. The reason I made this blog post and Hosk’s CRM Dev YouTube channel is The CRM 2013 SDK is a great resource but can be a little bit difficult to get started with but hopefully with the blog post and the video I will make it easier for you.
This video will a bit of plugin theory (the blog will just contain the steps to create and deploy the plugin) and I will try and explain what we are doing and practical because I will go through the process of creating and deploying the plugin, step by step.
You should have already watched these videos and are at the stage where you have CRM 2013 Developer Toolkit setup and pointing at your CRM 2013 organisation. If not watch the videos below
Blog Setup the CRM 2013 Developer Toolkit
Video step by step guide to setting up the CRM 2013 Developer Toolkit
Blog – Setup and understand Solutions
Video – CRM 2013 – Understanding Solutions and how they work in CRM 2013
Now it’s time to create a very simple plugin
Open Visual studio, you should have already setup the Visual Studio Developer toolkit, I created a package as shown in the picture below

This will Create a package, I removed the workflow project so I am just left with CrmPackage and Plugins projects

The important files above are the
RegisterFile.crmregister
This RegisterFile.crmregister is a file which holds the plugin registration data any plugins created in your CrmPackage. The details are then used to deploy plugins to CRM
Plugin
This is a default file created by the CRM 2013 Development Toolkit. When you create a plugin, it will extend the Plugin class and use it as a base. The Plugin class uses the IPlugin interface and has the important Execute methods which all CRM plugins must have and this is the main method called.
CRM Solution
Make sure you connected to the correct CRM organisation and you have specified the correct Solution, so when you deploy your plugin it will be included in the correct solution.
You can check this by going to
Tools –> Connect to Dynamics CRM Server
Press the Log on button and then you will be able to select an organisation value and a solution

CREATE A PLUGIN
To create a plugin open the CRM Explorer
Entities
Select Account
Right click and choose Create Plugin
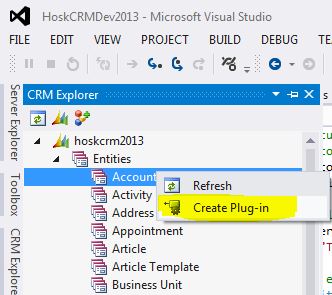
The Create plugin screen will be displayed.
Below I am creating a plugin to run on the update of the account entity
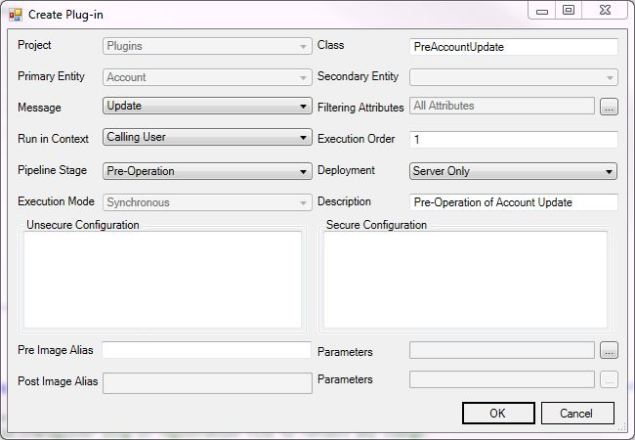
The Create Plug-in dialog box appears with the fields in the following table. This information was taken from the CRM 2013 SDK
http://msdn.microsoft.com/en-us/library/hh547400.aspx#BKMK_CreateAndDeploy
-
Field Description Project The plug-in library project in your Visual Studio solution. Class A recommended class name based on the selected pipeline stage and message. Primary Entity The entity that must be processed by the execution pipeline for the plug-in to execute. Secondary Entity Some messages require a secondary entity. See the documentation on the specific message for more information. Message The message that must be processed by the Microsoft Dynamics CRM execution pipeline for the plug-in to execute. Filtering Attributes A list of entity attributes that cause the plug-in to execute when it is changed. A value of null causes the plug-in to execute if any of the attributes change. When you specify a message that supports filtering attributes, for example Update, an ellipsis (…) button is displayed that lets you select attributes from a list. Run in Context Specify the system account that owns any data changes the plug-in makes. The Calling User is the logged on user who initiated the message to be processed. For more information, see Impersonation in Plug-Ins. Execution Order Specifies the order, also known as rank, that plug-ins are executed in a pipeline stage. Plug-ins registered by using an order value of 1 are executed first, followed by plug-ins registered by using an order of 2, and so on. However, if there is more than one plug-in in a stage with the same order value, the plug-in with the earliest compilation date is called first. Pipeline Stage Specifies when you want the plug-in to execute: before (Pre) or after (Post) the core operation that processes the message. For more information, seeEvent Execution Pipeline. Deployment Specify where you want the plug-in deployed: on the server, on Microsoft Dynamics CRM for Outlook with Offline Access, or both. Execution Mode For plug-ins registered to execute in a post stage, specify if you want them to execute immediately (synchronous) or queued to execute later (asynchronous). For post operations, specifying asynchronous execution gives you improved system performance compared to synchronous execution. Description A description of the step. Typically, you can describe the purpose of the step for other developers or administrators who might run the registration tool at a later date. Unsecure Configuration If you have written a constructor for the plug-in that takes one or two string arguments, any string values that you specify in these fields are passed to the plug-in constructor at run-time. For more information, see Write a Plug-In. Secure Configuration Pre Image Alias A pre-image is a snapshot of the entity’s attributes before the core operation. The entity alias value that you specify is used by your plug-in code as the key into the image collection. Parameters The list of attributes to be include in the pre-image. Post Image Alias A post-image is a snapshot of the entity’s attribute after the core operation. The entity alias value that you specify is used by your plug-in code as the key into the image collection. Parameters The list of attributes to be include in the post-image.
After you have finished selecting the choices for the plugin and press the OK button, a new file called PreAccountUpdate.cs will be created in the Plugin project. This will extend the Plugin class (a class created by the CRM 2013 Development Toolkit) and there will be a section for you to put in the code you want to execute in the plugin.
The Development Toolkit will also update the RegisterFile.crmregister adding a new line for the account plugin you have added. Warning if you have this file checked into source control it might not editable and you will get an error because the Development Toolkit will try to update the RegisterFile.crmregister but won’t be able to because it’s read only.
You will notice the guid values in the RegisterFile.crmregister are all 0000, this because proper guid values will be created when you register the plugin in CRM, at the moment the plugin does not exist in CRM yet. Below is the RegisterFile with the plugin that has been deployed so the guids have values.
<?xml version="1.0" encoding="utf-8"?>
<Register xmlns:xsi="http://www.w3.org/2001/XMLSchema-instance" xmlns:xsd="http://www.w3.org/2001/XMLSchema" xmlns="http://schemas.microsoft.com/crm/2011/tools/pluginregistration">
<Solutions>
<Solution Assembly="HoskCRMDev2013.Plugins.dll" Id="df794508-c1ba-e311-9d03-d89d6765d360" IsolationMode="Sandbox" SourceType="Database">
<PluginTypes>
<Plugin Description="Plug-in to PreAccountUpdate" FriendlyName="PreAccountUpdate" Name="HoskCRMDev2013.Plugins.PreAccountUpdate" Id="e2794508-c1ba-e311-9d03-d89d6765d360" TypeName="HoskCRMDev2013.Plugins.PreAccountUpdate">
<Steps>
<clear />
<Step CustomConfiguration="" Name="PreAccountUpdate" Description="Pre-Operation of Account Update" Id="d507df0f-c2ba-e311-bb7d-d89d6763fc38" MessageName="Update" Mode="Synchronous" PrimaryEntityName="account" Rank="1" SecureConfiguration="" Stage="PreInsideTransaction" SupportedDeployment="ServerOnly">
<Images />
</Step>
</Steps>
</Plugin>
</PluginTypes>
</Solution>
</Solutions>
<XamlWorkflows />
</Register>
<pre>
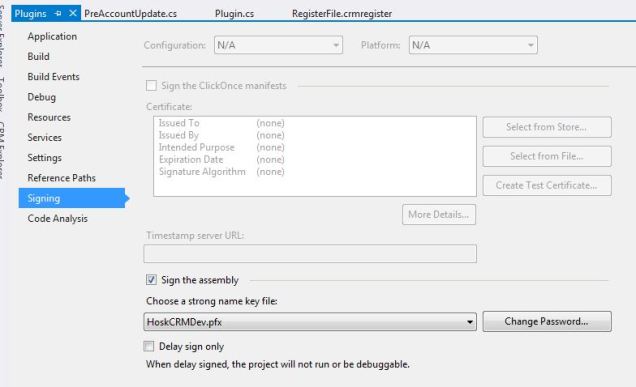
Sign the Plugin
All plugins in CRM 2013 must be signed. You do this by
Right Clicking the Plugin Project
Go to the Signing Tab
tick the Sign Assembly checkbox
look up an existing Key or create a new one
You don’t need to set a password if you don’t want to
save the changes and close the Plugin Properties page
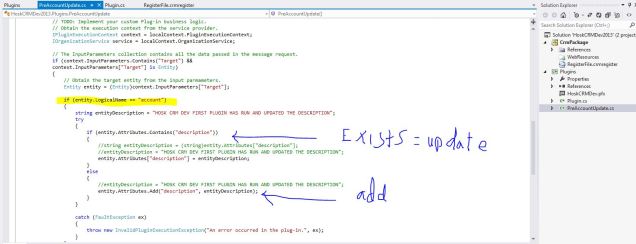
Create the Plugin Code
I am creating a very simple plugin, all it does it update the Description field on the account form when the account update is triggered, which will be 30 seconds because this will be triggered by the CRM 2013 autosave feature.
If the Description has been changed we overwrite it and if it hasn’t we add the description field
I am going to write this value
"HOSK CRM DEV FIRST PLUGIN HAS RUN AND UPDATED THE DESCRIPTION"
namespace HoskCRMDev2013.Plugins
{
using System;
using System.ServiceModel;
using Microsoft.Xrm.Sdk;
/// <summary>
/// PreAccountUpdate Plugin.
/// Fires when the following attributes are updated:
/// All Attributes
/// </summary>
public class PreAccountUpdate: Plugin
{
/// <summary>
/// Initializes a new instance of the <see cref="PreAccountUpdate"/> class.
/// </summary>
public PreAccountUpdate()
: base(typeof(PreAccountUpdate))
{
base.RegisteredEvents.Add(new Tuple<int, string, string, Action<LocalPluginContext>>(20, "Update", "account", new Action<LocalPluginContext>(ExecutePreAccountUpdate)));
// Note : you can register for more events here if this plugin is not specific to an individual entity and message combination.
// You may also need to update your RegisterFile.crmregister plug-in registration file to reflect any change.
}
/// <summary>
/// Executes the plug-in.
/// </summary>
/// <param name="localContext">The <see cref="LocalPluginContext"/> which contains the
/// <see cref="IPluginExecutionContext"/>,
/// <see cref="IOrganizationService"/>
/// and <see cref="ITracingService"/>
/// </param>
/// <remarks>
/// For improved performance, Microsoft Dynamics CRM caches plug-in instances.
/// The plug-in’s Execute method should be written to be stateless as the constructor
/// is not called for every invocation of the plug-in. Also, multiple system threads
/// could execute the plug-in at the same time. All per invocation state information
/// is stored in the context. This means that you should not use global variables in plug-ins.
/// </remarks>
protected void ExecutePreAccountUpdate(LocalPluginContext localContext)
{
if (localContext == null)
{
throw new ArgumentNullException("localContext");
}
// TODO: Implement your custom Plug-in business logic.
// Obtain the execution context from the service provider.
IPluginExecutionContext context = localContext.PluginExecutionContext;
IOrganizationService service = localContext.OrganizationService;
// The InputParameters collection contains all the data passed in the message request.
if (context.InputParameters.Contains("Target") &&
context.InputParameters["Target"] is Entity)
{
// Obtain the target entity from the input parmameters.
Entity entity = (Entity)context.InputParameters["Target"];
if (entity.LogicalName == "account")
{
string entityDescription = "HOSK CRM DEV FIRST PLUGIN HAS RUN AND UPDATED THE DESCRIPTION";
try
{
if (entity.Attributes.Contains("description"))
{
//string entityDescription = (string)entity.Attributes["description"];
//entityDescription = "HOSK CRM DEV FIRST PLUGIN HAS RUN AND UPDATED THE DESCRIPTION";
entity.Attributes["description"] = entityDescription;
}
else
{
//entityDescription = "HOSK CRM DEV FIRST PLUGIN HAS RUN AND UPDATED THE DESCRIPTION";
entity.Attributes.Add("description", entityDescription);
}
}
catch (FaultException ex)
{
throw new InvalidPluginExecutionException("An error occurred in the plug-in.", ex);
}
}
}
}
}
}
DEPLOYING THE PLUGIN
Now you have finished writing the code, it’s time to deploy the plugin in CRM. Your user will need to be a CRM Administrator. If you are deploying plugins which are not in sandbox Isolation mode then you will also need to be a Deployment Administator.
As I am deploying to CRM 2013 online then the plugin has to be only a CRM Administrator because the plugin has to be in sandbox isolation mode.
Right Click on CrmPackage
Press the Deploy button
You will either get an error or it will have worked. Often when it has worked it will inform you the RegisterFile.crmregister file has changed, this is CRM 2013 Developer Toolkit updating the file with Guid’s for the plugins.

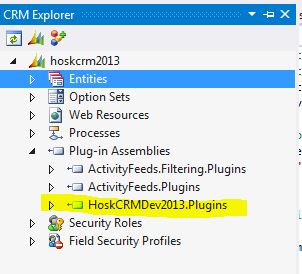
Check the plugin has been registered in the CRM organisation\database by looking at the CRM Explorer and checking in the Plug-in Assemblies section, you should see your new plugin highlighted in green
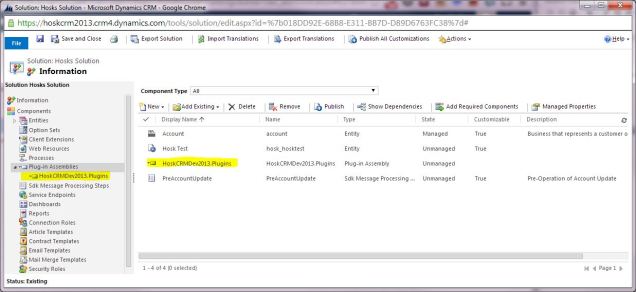
You can also check by opening your Solution and looking in the plugin assembles section.
I hope you subscribe to Hosk’s CRM Dev youtube channel where I will be going through the lots of different ares of CRM 2013 Development, this is useful for people who are starting out CRM Development, Developers who haven’t used CRM 2013 yet or just CRM Developers.
I am also studying for the MB2-703 – CRM 2013 Customization and Configuration exam and have a playlist with those videos
https://www.youtube.com/playlist?list=PLsOVDEkdRUuyY0xRq8flZ-ePOcBvZ-XpJ

How to write plugin that will write a record to a text file whenever there is a insertion of record in a custom entity?
LikeLike
Hi,
I was able to implement your example here on one of my custom entities. It works great when I manually save the form. However, it doesn’t seem to trigger when a workflow updates the entity. Do you know why?
I don’t check for any context depth.
I am running the PreOperation Sychronous Update Plugin. Can a workflow trigger this plugin after it does its updating?
Thanks
Ian
LikeLike
This was very helpful in learning how to create CRM plugins. Now I am looking for a way to connect to Sharepoint Online from within a plugin – any tutorials on that?
LikeLike
I haven’t done any but there are few blogs out there which might get you on your way
LikeLike
Very Nice information you share here in this blog Thanks !!
LikeLike
nice tutorial i am new in dynamics CRM really helped me out but i am stuck because of one error
I’ve created plugin and register it successfully using registration tool but when i deploy it in my visual studio it throws following error.
Error registering plugin and/or workflows. action failed for assembly ” CRMpluginEX.workflow”, version 1.0.0.0 , culture = neutral Publickeytoken=”key”: assembly must be registered
i cant figure out why it is saying assembly must be registered , even after i register my plugin and it returned success
11
i am using crm sdk 2013
in registration i select sandbox
thanks in advance
LikeLike
Hello
Have you looked at this page with common plugin problems
It looks like you need to sign the DLL, have you done that?
If that isn’t the cause of the problem, I would raise the error on the CRM Forum where lots of CRM experts will look at the problem
LikeLike
Useful blogs to learn about CRM plugin. The tutorial is good to notice all the points step by step.
LikeLike
Hi. I’ve tried building a plugin in a similar way to this, but when creating it I selected a specific user for the ‘Run in Context’, which had sys admin privileges so that it will be able to update another custom entity called autonumber, with the new number. Unfortunately I can’t seem to get this to work. It only seems to run in the context of the calling user, which doesn’t have the right privileges, so my autonumber entity is never getting updated. The OrganzationService in the base class Plugin.cs is being created using the default code: this.OrganizationService = factory.CreateOrganizationService(this.PluginExecutionContext.UserId); It was my understanding that by using UserId instead of InitiatingUserId would use the ‘Run in Context’ user. Is there something I’m missing. Does my user need to be in the PrivUserGroup if I’m using AD?
LikeLike
What is the value of the InitiatingUserId?
Why don’t you run at system admin by doing this
this.OrganizationService = factory.CreateOrganizationService(null);
null signifies System admin user
https://msdn.microsoft.com/en-us/library/microsoft.xrm.sdk.iorganizationservicefactory.createorganizationservice.aspx
I would raise this question on the CRM forum, give more details, show your code and someone will help resolve it.
LikeLike
the service is created in the base class Plugin.cs, which all plugins will use. I don’t want all plugins to run at the system administrator level, so wondered if there’s something I’m doing wrong?
LikeLike
Without seeing the code it’s almost impossible for me to tell if you are doing something wrong. you could have an if statement stopping the code from running, you might be assigning a null value.
Create a CRM forum question, post the details and code on there and then people will help you. Feel free to post a link to the forum question here
LikeLike
Here’s a link to my question posted on the crm forum: https://social.microsoft.com/Forums/en-US/89bbb9b8-47b9-4c8b-9dcd-7637428e83ec/plugin-not-running-as-impersonated-user-but-as-the-calling-user-instead?forum=crm
LikeLike
Hi, and thanks for laying this out nicely. I am, however, not fully understanding the modify of existing plugin. I have a custom plugin created by previous CRM admin, and I need to add another execution. Preferably to the existing, so I don’t add another stand-alone doing similar tasks.
I have extracted the existing dll file, and decompiled the code needed.My question is “how do I copy/paste this code, modify for my needs, and recompile an update to the server?”
Did I miss something? Can you advise easiest method?
Thanks in advance!
LikeLike
You need to find the visual studio solution which is updating the plugin. You have to publish the code using the same publisher and solution.
You could undeploy the plugin and deploy a new one if you really wished.
LikeLike